

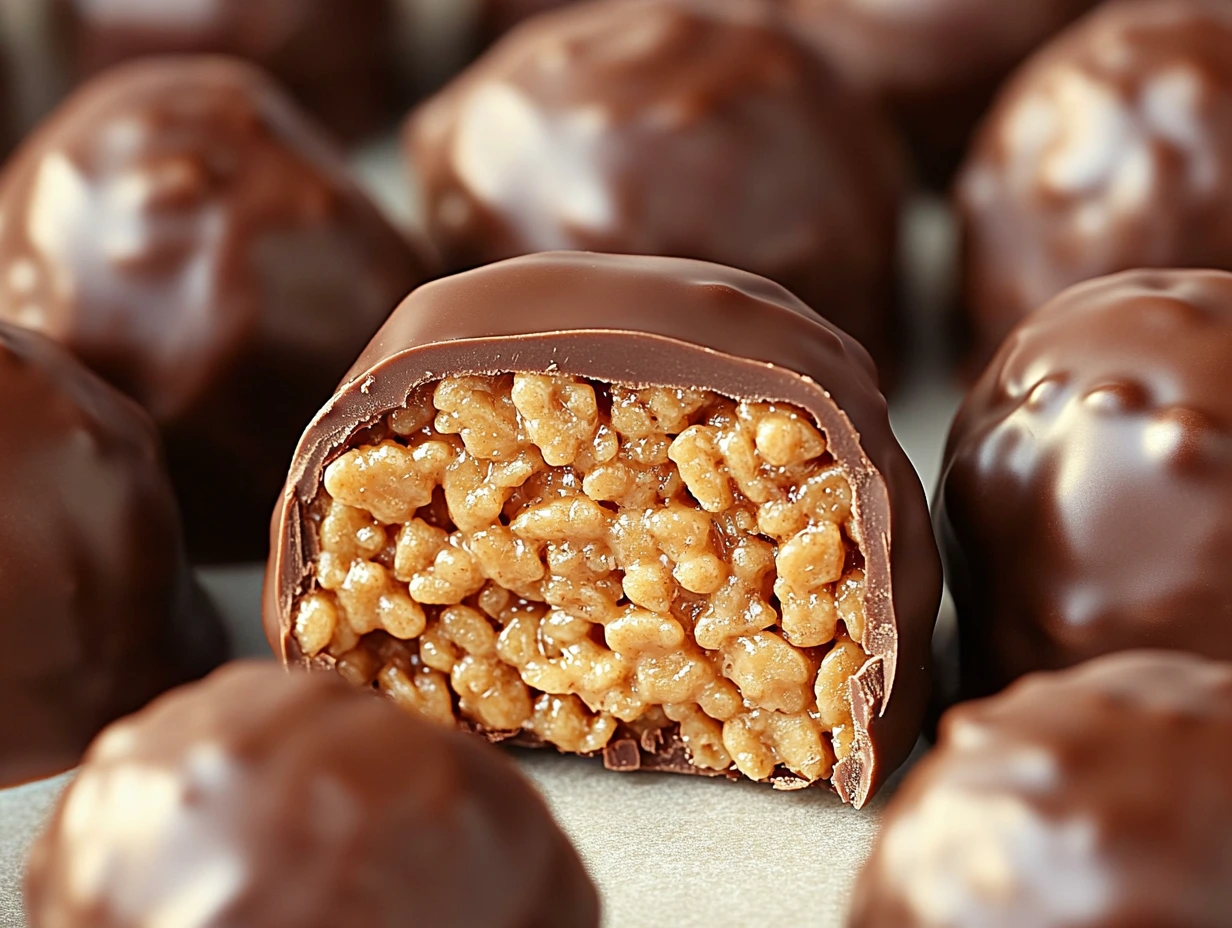
If you’re anything like me, you know that sometimes the simplest treats can be the most satisfying. That’s exactly what these Peanut Butter Balls with Rice Krispies are—a delightful mix of creamy, crunchy, and chocolatey goodness that’s ridiculously easy to make! Whether you’re whipping up a quick dessert for a party, packing snacks for the kids, or indulging your sweet tooth after a long day, these no-bake bites are a total game-changer.
I first discovered this recipe when I needed a quick treat to bring to a last-minute gathering. Let me tell you, these little bites stole the show. The combination of peanut butter and chocolate is a classic, but the addition of Rice Krispies gives them a fun, unexpected crunch that makes everyone reach for seconds (or thirds!).
But don’t just take my word for it. Let’s dive into the recipe so you can experience the magic for yourself.
Step 1: Prepare Your Baking Sheet
Before we get to the fun part, let’s set ourselves up for success. Grab a cookie sheet and line it with parchment paper or wax paper. Trust me, this step is a lifesaver when it’s time to remove the peanut butter balls later. Plus, it makes cleanup a breeze.
Step 2: Mix the Peanut Butter Base
Now, it’s time to bring the main players together. In a large mixing bowl, combine:
- 1 cup peanut butter (creamy works great for smooth bites, but crunchy adds a little extra texture!)
- ¼ cup butter, softened to room temperature for easy mixing
- 1 cup powdered sugar
Using a hand mixer or a sturdy spoon, blend these ingredients until you have a smooth, creamy mixture. At this point, it already smells heavenly, but we’re just getting started.
Step 3: Add the Crunch
Here’s where the magic happens. Take 2 cups of Rice Krispies cereal and gently crush them with your hands—just enough to break them up a little without turning them into dust. Fold these into your peanut butter mixture, making sure they’re evenly distributed. The cereal adds that irresistible crunch that makes these treats stand out from the usual peanut butter balls.
Step 4: Roll into Bite-Sized Balls
Once your mixture is ready, it’s time to get hands-on. Scoop out small portions (about a tablespoon each) and roll them into bite-sized balls. If you find the mixture sticking to your hands, lightly dust your palms with powdered sugar or use a small cookie scoop to keep things neat.
Place your perfectly shaped balls onto the lined cookie sheet. Don’t worry about spacing them out too much—they just need enough room to chill without sticking together.
Pop the tray into the refrigerator and let the balls set for at least 30 minutes. This helps them firm up, making the next step much easier.
Step 5: Melt the Chocolate
It’s time to turn up the heat—just a little! Grab a microwave-safe bowl and combine:
- 2 cups semi-sweet chocolate chips
- 2 tablespoons vegetable shortening (this helps the chocolate melt smoothly and gives it a glossy finish).
Microwave the mixture for about one minute, then give it a good stir. Continue heating in 20–30-second intervals, stirring after each round, until the chocolate is completely melted and silky smooth. Be careful not to overheat, as chocolate can scorch easily.
Pro Tip: If you prefer using a double boiler, that works great too! It’s an excellent way to maintain even heat and prevent burning.
Step 6: Dip the Peanut Butter Balls
Now for the fun part! Remove your chilled peanut butter balls from the refrigerator. Using a fork or a specialized dipping tool (if you have one), carefully dip each ball into the melted chocolate, ensuring it’s fully coated.
Let any excess chocolate drip off before placing the coated ball back onto the parchment-lined cookie sheet. Work methodically, one ball at a time, and try to resist the urge to taste-test too many (though I won’t blame you if you do).
Pro Tip: For a touch of flair, sprinkle your chocolate-coated balls with crushed peanuts, sprinkles, or a drizzle of white chocolate while the coating is still wet. It adds a decorative and flavorful twist!
Step 7: Let the Chocolate Set
Once all your peanut butter balls are coated, allow the chocolate to set. You can let them firm up at room temperature if you’re patient, but for quicker results, place the tray back in the refrigerator. In about 20–30 minutes, your treats will be ready to enjoy.

Tips and Tricks for Perfect Peanut Butter Balls
1️⃣ Choose Your Peanut Butter Wisely:
Natural peanut butter can be tempting, but its runny consistency might make these balls harder to shape. Stick to regular peanut butter for the best results.
2️⃣ Crush with Care:
When crushing your Rice Krispies, aim for a balance. Too fine, and you’ll lose the crunch; too coarse, and they might not mix well. A gentle squeeze is all you need.
3️⃣ Double Dip for Extra Decadence:
If you’re a serious chocolate lover, dip your peanut butter balls a second time after the first layer sets. Double the chocolate, double the fun!
4️⃣ Temperature is Key:
Make sure your peanut butter mixture is firm and chilled before dipping. If it softens too much, pop the tray back into the fridge for a few minutes.
5️⃣ Chocolate Consistency Matters:
If your melted chocolate starts to thicken as you work, pop it back in the microwave for 10–15 seconds to loosen it up.
FAQ Section and Conclusion
We’ve reached the final chapter of this sweet journey. By now, your peanut butter balls are set, coated in luscious chocolate, and ready to impress. Whether you’re planning to share these treats or keep them all to yourself (no judgment here!), let’s address some common questions to help you perfect this recipe.
FAQ Section
1. Can I use a different cereal instead of Rice Krispies?
Absolutely! While Rice Krispies are the classic choice, you can substitute them with similar cereals like cornflakes or crushed Cheerios. Just make sure they’re slightly crushed for a manageable texture.
2. Can I make these peanut butter balls dairy-free?
Yes! Swap the butter for a plant-based alternative and use dairy-free chocolate chips. Coconut oil can also replace the vegetable shortening for a creamy finish.
3. How should I store peanut butter balls?
Keep your peanut butter balls in an airtight container. They’ll stay fresh in the refrigerator for up to a week or in the freezer for up to a month. For best results, place parchment paper between layers to prevent sticking.
4. Can I make these treats ahead of time?
Definitely! Peanut butter balls are perfect for making ahead. Prepare and store them in the fridge or freezer until you’re ready to serve.
5. How do I prevent the chocolate from cracking?
Make sure your peanut butter balls are chilled but not frozen solid before dipping. Sudden temperature changes can cause the chocolate to crack as it sets.
6. What’s the best way to melt the chocolate?
Microwaving is quick and easy, but if you prefer more control, use a double boiler. Stir frequently and keep the heat low to avoid scorching the chocolate.
7. Can I customize these treats?
Absolutely! Add mix-ins like mini chocolate chips, chopped nuts, or shredded coconut to the peanut butter mixture. You can also experiment with white or dark chocolate coatings for a fun twist.
Conclusion
And there you have it—delicious, no-bake Peanut Butter Balls with Rice Krispies that are perfect for every occasion. Whether it’s a holiday dessert tray, a party snack, or a sweet treat just because, these little bites are guaranteed to impress.
The best part? They’re so simple to make, you might find yourself whipping up batch after batch. Plus, the recipe is wonderfully flexible, allowing you to add your own creative spin.
If you give these peanut butter balls a try, let me know how they turned out! Did you add your own twist or stick to the classic recipe? Share your thoughts in the comments below or tag me in your creations on social media—I’d love to see how you made this recipe your own.
Happy no-baking, friends! Now, go grab a treat (or two) and enjoy every chocolatey, crunchy bite.
Print
Peanut Butter Balls with Rice Krispies
- Total Time: 45 mins
Description
These no-bake peanut butter balls are a perfect treat for any occasion. Packed with crunchy Rice Krispies and coated in rich chocolate, they’re quick, easy, and irresistibly delicious.
Ingredients
- 1 cup peanut butter (creamy or crunchy)
- ¼ cup butter, softened
- 1 cup powdered sugar
- 2 cups Rice Krispies cereal, slightly crushed
- 2 cups semi-sweet chocolate chips
- 2 tablespoons vegetable shortening
Instructions
1️⃣ Prepare a Baking Sheet:
Line a cookie sheet with parchment paper or wax paper to prevent sticking.
2️⃣ Mix Ingredients:
In a large mixing bowl, cream together the peanut butter, softened butter, and powdered sugar until the mixture is smooth. Gently fold in the slightly crushed Rice Krispies cereal, ensuring everything is well combined.
3️⃣ Form the Balls:
Take small portions of the mixture and roll them into bite-sized balls. Place the balls onto the prepared cookie sheet and refrigerate for at least 30 minutes to set.
4️⃣ Melt the Chocolate:
In a microwave-safe bowl, combine the chocolate chips and vegetable shortening. Microwave for 1 minute, then stir. Continue heating in 20–30-second intervals, stirring each time, until the chocolate is fully melted and smooth.
5️⃣ Dip the Balls:
Using a fork or dipping tool, carefully coat each peanut butter ball in the melted chocolate. Place the dipped balls back onto the cookie sheet and let them firm up at room temperature or in the refrigerator.
6️⃣ Storage:
Store the finished peanut butter balls in an airtight container. They will keep in the refrigerator for several days or can be frozen for up to several weeks.
Notes
- For extra flair: Decorate the tops with sprinkles, sea salt, or a drizzle of white chocolate before the chocolate coating sets.
- Substitutions: Almond butter or sunflower seed butter can replace peanut butter for dietary preferences.
- Pro Tip: Crushing the Rice Krispies slightly helps them mix evenly and creates a great texture balance.
- Prep Time: 15 mins
- Cook Time: 30 mins
