

Is there anything better than a dessert that’s quick, easy, and doesn’t even require turning on the oven? Peanut Butter No-Bake Cookies check all the boxes when it comes to convenience and deliciousness. Whether you’re in the mood for a midnight snack, whipping up a quick treat for the kids, or planning a potluck dessert, these cookies have got your back. They’re rich, chewy, and full of peanut buttery goodness, all while being effortlessly simple to make.
I remember the first time I made these cookies—my kitchen smelled like a chocolate and peanut butter dream! They were the perfect dessert for a summer afternoon when it was just too hot to bake. Best of all? There’s no waiting around for hours to enjoy them. A quick cool-down, and they’re ready to devour.
Now let’s dive into the first steps of creating these delightful no-bake wonders. Get your apron on, and let’s make some cookie magic happen!
Gather Your Ingredients
Before we get started, make sure you’ve got everything ready. Here’s what you’ll need:
Wet Ingredients:
- 1/2 cup (1 stick) unsalted butter
- 2 cups granulated sugar
- 1/2 cup whole milk
- 1 cup creamy peanut butter
- 1 teaspoon vanilla extract
Dry Ingredients:
- 3 cups quick-cooking oats
- 1/2 cup unsweetened cocoa powder
- Pinch of salt
These are pantry staples for most of us, which makes this recipe even more convenient. If you’re missing an ingredient or two, don’t worry—I’ll share some easy swaps and tips later.
Step 1: Prepare the Cookie Mixture
First things first, grab a medium-sized saucepan. Add your unsalted butter, granulated sugar, and whole milk to the pan. Place it over medium heat and stir occasionally to keep everything melting smoothly. The goal is to combine these ingredients into a silky mixture.
As the mixture heats up, you’ll notice it start to bubble. Let it come to a rolling boil, and keep it there for 1-2 minutes. Stir constantly to prevent any scorching—trust me, burnt sugar is not the vibe we’re going for here. Once the timer’s up, remove the saucepan from the heat.
Now, the fun part: add your creamy peanut butter and vanilla extract to the hot mixture. Stir it all together until it’s smooth, glossy, and smells like heaven.
Step 2: Mix It All Together
While your peanut butter mixture is still warm, it’s time to bring in the dry ingredients. In a large mixing bowl, combine the quick-cooking oats, unsweetened cocoa powder, and a pinch of salt. Give it a good stir to make sure the cocoa powder is evenly distributed.
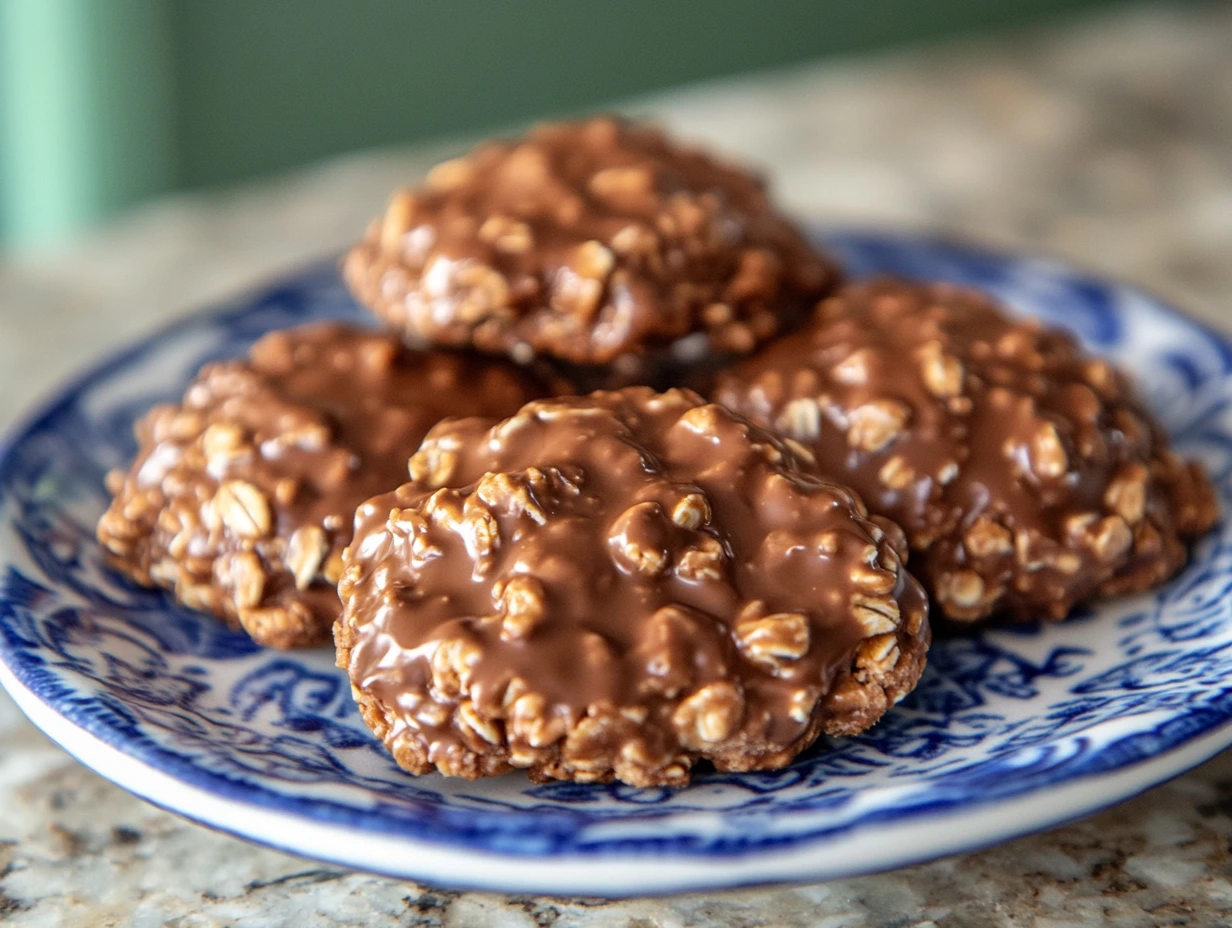
Pour the warm peanut butter mixture over the dry ingredients. Here’s where the magic really happens—stir everything together until the oats are fully coated, and the chocolatey goodness has seeped into every bite. The mixture will look thick and irresistible, like the ultimate cookie dough.
Step 3: Shape the Cookies
Now that your mixture is ready, grab a baking tray or a large sheet of wax paper. This will be your cookie canvas. I love lining my tray with parchment paper—it makes cleanup a breeze and ensures the cookies don’t stick.
Using a spoon or a cookie scoop, drop dollops of the mixture onto the prepared tray. The size is up to you, but about a tablespoon per cookie is just right for a classic no-bake look. If you’re feeling fancy, use a cookie scoop for uniform sizes (because let’s be honest, consistency makes them even more satisfying to eat).
Here’s a pro tip: flatten the mounds slightly with the back of the spoon for a traditional cookie shape. Or, if you prefer a more rustic vibe, leave them as adorable little mounds. Either way, they’ll taste amazing.
Step 4: Cool and Set
Once all your cookies are scooped and shaped, it’s time to let them cool and firm up. Patience is key here—resist the urge to dig in too soon (I know, it’s hard!).
There are two ways to set these cookies:
- Room Temperature: Let them sit on the counter for about 15-20 minutes. This method is great if you’re multitasking or just letting the cookies do their thing while you clean up.
- Refrigerator Quick Set: If you’re short on time (or just really impatient), pop the tray in the fridge for 10 minutes. The cookies will firm up much faster, and you’ll be munching on your masterpiece in no time.
Whichever method you choose, the result will be the same: perfectly set, chewy cookies with just the right amount of firmness.

Pro Tips for No-Bake Perfection
Here are a few extra tricks to ensure your cookies turn out flawless every time:
- Boil Time is Key: Boiling the butter, sugar, and milk mixture for exactly 1-2 minutes is crucial. Too short, and your cookies may not set properly. Too long, and they could turn crumbly. Set a timer to keep things on track.
- Peanut Butter Choices: Creamy peanut butter works best for that smooth, classic texture. If you love a little crunch, feel free to use chunky peanut butter—just be prepared for a slightly less uniform mixture.
- Oats Matter: Quick-cooking oats are ideal because they absorb the wet ingredients perfectly. Old-fashioned oats can work in a pinch but will give the cookies a chunkier texture. Avoid steel-cut oats—they’re too dense for this recipe.
- Flavor Variations: Want to mix things up? Add a handful of mini chocolate chips, shredded coconut, or chopped nuts to the batter. These little extras can add fun textures and flavors.
- Clean Scooping: If the mixture starts sticking to your spoon or scoop, lightly grease it with a bit of nonstick spray. This will make shaping the cookies a breeze.
Optional Add-Ons to Elevate Your Cookies
If you’re looking to take these no-bake cookies to the next level, here are some creative ideas:
- Drizzle It: Melt a little extra chocolate and drizzle it over the set cookies for a gourmet touch.
- Sprinkle Love: Top each cookie with a pinch of sea salt, colorful sprinkles, or even crushed pretzels for a sweet-and-salty crunch.
- Dip Halfway: Once the cookies are set, dip them halfway into melted chocolate and let them harden. The result? A decadent two-tone cookie that’s as Instagram-worthy as it is delicious.
FAQs and Final Thoughts on Peanut Butter No-Bake Cookies
By now, your kitchen is filled with the irresistible aroma of chocolate, peanut butter, and sweet nostalgia. Your cookies have set, and you’ve (hopefully) resisted eating the entire batch in one sitting. As we wrap up, let’s dive into some frequently asked questions to ensure you nail this recipe every time. Plus, I’ll share some final thoughts to leave you inspired to make these cookies again (and again!).
Frequently Asked Questions
1. Why aren’t my cookies setting properly?
If your cookies are too soft and not firming up, the likely culprit is under-boiling the sugar mixture. Boiling for the full 1-2 minutes is essential to help the mixture reach the correct consistency. Double-check your timing next time, and don’t skip this step!
2. Can I use natural peanut butter?
While natural peanut butter can work, it tends to separate and may not bind as well as the creamy, processed kind. If you prefer to use natural peanut butter, make sure to stir it thoroughly before adding it to the mixture.
3. Can I make these cookies gluten-free?
Absolutely! Swap the quick-cooking oats for certified gluten-free oats, and you’re good to go. This is a great option for sharing with friends or family who have dietary restrictions.
4. How do I store no-bake cookies?
Store your cookies in an airtight container at room temperature for up to a week. If you prefer them firmer, keep them in the fridge. They’ll stay fresh and delicious for up to 10 days when refrigerated.
5. Can I freeze these cookies?
Yes! These cookies freeze beautifully. Place them in a single layer in an airtight container or freezer-safe bag, separating layers with parchment paper. They’ll keep for up to three months. Just thaw them at room temperature for 10-15 minutes before enjoying.
6. Can I use old-fashioned oats instead of quick-cooking oats?
You can, but the texture will be chunkier and less cohesive. If that’s your preference, go for it! Just keep in mind that the mixture might not bind as smoothly.
7. What variations can I try?
This recipe is wonderfully versatile. Add a handful of mini chocolate chips, crushed pretzels, shredded coconut, or dried fruit for an extra layer of flavor and texture. You can even swap peanut butter for almond butter or sunflower seed butter for a nut-free version.
Conclusion: The Ultimate No-Bake Cookie Experience
Peanut Butter No-Bake Cookies are more than just a quick treat—they’re a little slice of sweet simplicity that fits into any busy schedule. Whether you’re a seasoned baker or a total newbie in the kitchen, this recipe guarantees success and smiles every time.
The best part? These cookies bring people together. Whether you’re making them for a holiday gathering, a school bake sale, or just to enjoy with a cozy cup of coffee, they’re sure to become a favorite. Plus, with so many ways to customize and adapt them, you’ll never get bored.
So what are you waiting for? Grab your saucepan, stir up some peanut butter magic, and don’t forget to share your creations (and variations) in the comments below. I’d love to hear how you make these cookies your own!
Until next time, happy no-baking!
Print
Peanut Butter No-Bake Cookies
- Total Time: 45 mins
Description
Skip the oven and treat yourself to these rich and creamy Peanut Butter No-Bake Cookies! Perfectly chewy, with a balance of chocolatey sweetness and peanut butter goodness, these cookies are quick to make and utterly satisfying. They’re ideal for last-minute cravings or as a fun project with kids.
Ingredients
Wet Ingredients:
- 1/2 cup (1 stick) unsalted butter
- 2 cups granulated sugar
- 1/2 cup whole milk
- 1 cup creamy peanut butter
- 1 teaspoon vanilla extract
Dry Ingredients:
- 3 cups quick-cooking oats
- 1/2 cup unsweetened cocoa powder
- Pinch of salt
Instructions
1️⃣ Prepare the Cookie Mixture:
In a medium saucepan, combine the butter, sugar, and milk. Place over medium heat and stir occasionally until the mixture comes to a boil.
Let it boil for 1-2 minutes, stirring constantly to prevent burning.
Remove the saucepan from the heat and immediately stir in the peanut butter and vanilla extract until smooth.
2️⃣ Mix with Dry Ingredients:
In a large mixing bowl, combine the oats, cocoa powder, and a pinch of salt.
Pour the hot peanut butter mixture over the dry ingredients and stir thoroughly until evenly combined.
3️⃣ Shape the Cookies:
Drop spoonfuls of the mixture onto a sheet of wax paper or a lined baking tray. Use a cookie scoop for uniform sizes if desired.
Flatten slightly with the back of the spoon for a cookie shape or leave as mounds for a more rustic look.
4️⃣ Cool and Set:
Let the cookies cool at room temperature for 15-20 minutes, or until they firm up. For faster setting, refrigerate for 10 minutes.
5️⃣ Serve and Enjoy:
Once set, enjoy your no-bake cookies with a glass of cold milk or as a standalone treat. Store leftovers in an airtight container at room temperature for up to a week.
Notes
- Customizations: Add mini chocolate chips or shredded coconut for extra texture and flavor.
- Consistency Tip: If the mixture is too runny, add an extra 1/4 cup of oats. If too thick, add a splash of milk.
- Healthier Swaps: Substitute sugar with a natural sweetener like honey or maple syrup, and use unsweetened almond butter for a lighter version.
- Prep Time: 5 mins
- Cook Time: 20 mins
